|
|
||||||||||||
|
|
|
Westchester Web Design |
| SN-95 Ram Air/Cold Air | |
| a corral original article | |
| Scott Winger |
CORRAL UNIVERSAL RATING SYSTEM:
| Difficulty (Easy 1-10 Difficult) | Pretty Easy | |
| Special Tools (Few 1-10 Many) | None | |
| Price (Cheap 1-10 Expensive) | Cheap | |
| Quality (Poor 1-10 High) | Home-Made | |
| Improvement (None 1-10 Alot) | Noticeable |
This article explains how to install an effective Cold Air and Ram-Air set-up on your Modular Mustang. It was originally written by my good friend, Nine-Ball, an engineer from Houston and installed it on his 96GT(now a Formula owner - shame on him?). I installed this on my Cobra and now have added pictures and part numbers which will assist the install and provide more detailed information for the Cobra owner. This article is a combination of Tony’s original notes and my own.
There are after-market units that you can purchase but NONE of the ram-air units will perform anywhere near as well as this modification. Plus none can be purchased for $20 (Ram-air) or $5 (Cold-air).
Tony produced an effective ram air system for his 96GT. This install is MUCH easier to do on the GT than on the Cobra because of an “Air-box” unit which is in the fender on the Cobra. Anyway, Tony searched every aisle of the local Builder's Store and finally found something of use! It came in the form of 1.2 foot long, 5" diameter four-joint aluminum sheet pipe. Basically it is dryer and furnace ducting. It has four connected pieces which can rotate a full circle at their joints. Each section has about a 22.5 degree shape. This means, if you turn the joints a certain way, you can end up with any angle between 0 and 90 degrees. This is NOT the corrugated flex tube, but the smooth material.
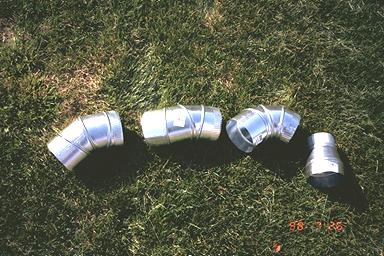
Picture 1 shows 3 of these pieces plus a reducer (also
needed).
| Needed:
(the part #s and descriptions given are for Home Depot
stores)
For Ram Air:
For Cold-Air induction: The only part needed is the 5” to 4” reducer and one piece of the 5” ducting. |
Here we go!
| Put the front end of your car on jack stands (safety is first). |
Remove the
airbox/silencer/filter from your car (for room to work).
On the Cobra you also need to remove your Strut Tower Brace
(if you have one), and remove the MAF and inlet tube leading
to your throttle body.
| Separate the silencer and airbox (if this has not been removed yet), Just pull it apart! |
Cut back the factory air silencer about 6 inches from the snorkel end (see picture 2) . this will make the diameter large enough to fit over the 4" end of the 5 X 4 reducer (it stretches - make it tight). Tony and I used a hacksaw. Cut the snorkel approximately where the picture has the white line.
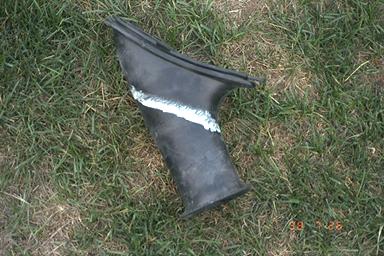
Picture 2 Shows the Air Silencer and Cut line
The aluminum
4" end of the 5 X4 reducer should be bent slightly in an oval
shape to fit inside the oval air silencer hole. Make sure to
cut the hole so that it is parallel to the line of the fender.
You may have to install the silencer and mark it to be sure.
Once it is trimmed to the right size, attach it to the 4” end
of the reducer. Remember that the snorkel goes over-top
of the 4” end of the reducer, not the other way around.
Now that you have it fitting together perfectly, take the snorkel
back off from the reducer and set it aside for later.
| Attach three sections of the 5” ducting together (or use 1 section if you are doing cold-air induction only) , and use 2 screws in each to secure them. Then attach to one end, the 5” to 4” reducer, again using 2 screws. It’s easier to put the screws in if you drill a tiny hole first. |
Now from under the car, stick this entire piece up the fender (4” end first) and into the hole leading into the engine compartment (where the snorkel used to go), shaping the pipe as you go will help here. Also, get a friend to help from above. This step is not that difficult on the GT, but it is EXTREMELY difficult on the Cobra because there is a unit called an “Air-box” that is smack dab in the middle of where you want to go, mounted at the top of the fender. It has a couple of hoses coming out of it that feed the catalytic converters on start-up. It is very tough to get the ducting past this unit, but since I did it (all by myself) I’m sure anyone else can too. Patience helps big time! Gee, didn’t SVT know we wanted to put 5” ducting in there??? LOL. The next picture illustrates basically how the ducting will route itself through the fender. You won’t have the large reducer on the bottom end yet, and if you are only doing cold air, this piece will obviously be much shorter.
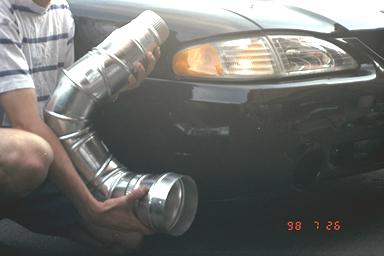
Picture 3
| Once the 4" end is through the fender, reconnect it to the air silencer, making it as tight as you can get it (the silencer should NOT be on the airbox yet) |
Re-attach
the silencer to the airbox (saliva helps) and go ahead and re-install
the filter/airbox/silencer. Because of the extra stiffness and
lack of flexibility, I couldn’t reconnect the airbox to the
fender wall using the supplied bolt, in fact I cut the
side attachment off with the hacksaw along with the foot on
the bottom of the airbox - I needed the room. You may
get lucky and not have to do this. On the GT you are done
under the hood, on the Cobra you now need to reconnect the MAF
and then lastly the inlet tube to the throttle body. Don’t
forget to reconnect the 2 sensor switches at the MAF, which
you had to disconnect to remove the inlet tube. If you
are doing the cold-air induction only, you are done (Just aim
the tube forward & down.) and you can now relax and go for
a drive (don’t forget to lower your car first, hehe).
| **Note: Because of the tight fit of the silencer on the reducer, it will hold the lightweight piping assembly just fine (since all the other pieces are screwed together). Neither Tony nor myself needed any extra supports. Plus the first 90 degree bend also presses firmly against the fender, so it won't move once installed. |
Remove the
fog-light.
| Depending on how exactly you have routed your ducting, you may be within one more piece of ducting from the fender, a little further than that , or even a little closer. Also, it’s not completely necessary on the GT to be touching the fender since there is no lip there to use as a support (there is on the cobra). Installing the 6 X 5 reducer on the GT is your choice. |
Hold up the
last piece of 5” ducting and the 6 X 5 reducer and see how well
it fits. Once it seems to be fitting perfectly than take
it back off and screw the 2 pieces together. On the Cobra
you want it to fit over top of the lip of the fog-light hole.
You can adjust the length of this piece if it is too long by
prying out sections of the 5” ducting. You will have to
pull really hard (close to the rivets) but they WILL come apart.
Don’t install this piece yet.
| On the GT cut a piece of the screen using pliers or wire cutters that will fit over the 6” end or the 5” end if you didn’t use the reducer, and bend it around the end. Use the cylindrical clamp to hold this screen in place. On the Cobra, cut the screen to size, than from underneath place it over the inside of the fog-light hole bending the screen around the lip. Pictures 4 and 5 show what the hole looks like on the Cobra with and without the screen. I recommend strongly using this screen to prevent stones leaves and seagulls from getting up in your filter box! |
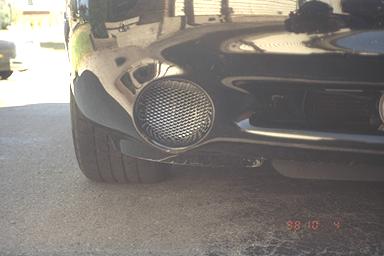
Picture 4
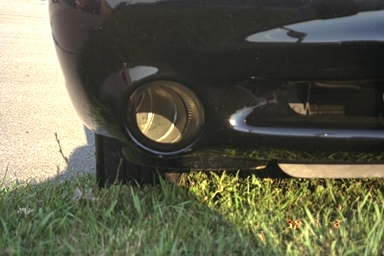
Picture 5
Now go back under the car and attach the last piece. Now you need to secure it with screws (this is tricky since the rest is already installed - being a contortionist will help;-). On the cobra you now need to use the cylindrical clamp and tighten it up over the screen/duct/lip/ area. I pulled the other fog-light also and installed the screen so that they would match!
Hey guess what…..you’re done.
Total installation time (not including shopping) is about 2 hours on the GT and a couple more than that on the Cobra! There is no question it pulls much harder than before, and it even sounds better. Both Tony and I have seen improvements of approximately 3/10ths in the ¼ and about 1 mph (not bad for $20 Eh). If you have any questions, e-mail me at Scott.Winger@sympatico.ca and I'll be glad to help.
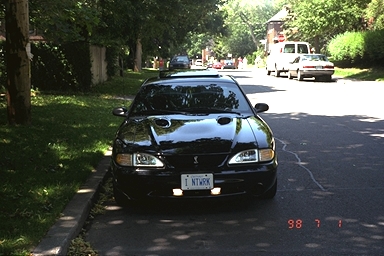
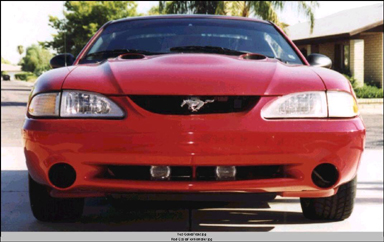
I took this setup one step further on my Cobra. Since I lost the fog light I moved them both to the spoiler. Each one is dead center on each side of the license plate and just below (see picture 6). It now has the “Stocker” look. Picture 7 is owned by Dennis who followed my “Fog-light re-location” notes as well as installing the ram air as outlined. It looks amazing without the front plate (no choice in Canada).
Picture 6
Picture 7
The original wiring also reached to the new location which was a bonus. What is even better is that now the fog lights actually work! I guess because they are away from the headlights they aren’t getting lost in the rays. The GT spoiler unfortunately isn’t big enough to do this, so Tony got some after-market bulbs and used them instead. If you want the written instructions for the “Fog-light re-location” for the Cobra, e-mail me and I’ll send you the text in Word format.
Scott Winger (§cott 96Çobra)
Write-up
@ Corral: http://www.corral.net/ |