|
|
||||||||||||
|
|
|
Westchester Web Design |
I recently acquired a bassani O/R X pipe and decided to do some research and learn how to make my own MIL Eliminators. Since the O2 bungs were located pretty far back on the bassani pipe, I would also have needed to buy O2 extension wires. The total cost for the MILs and the Extensions was going to be about $100, but I instead built my custom setup for only $20 in radio shack parts.
The parts/part numbers from radio shack that you will need are:
#2760148 - PC Board - 1 Package
will do. You can break the board in half.
#2721434 - Tantalum Capacitor - You need 2 of these
#2711356 - This is a 5 pack of 1 mega ohm resistors. One pack is enough.
You will also need 20 gauge wire(25 ft. or so), electrical tape, solder, and a soldering iron. If you don't have these items they can also be bought at radioshack.
You will need to remove your stock rear O2 sensors for this process.
Start by carefully cutting off the outer sheathing from the O2 sensor wiring. Once it is off you will notice that there are 4 different wires -- A Gray wire, a Black Wire, and two White wires. You will want to mark one of the white wires because they will have to be matched up in their original configuration when everything is soldered back together.
Next cut through all 4 wire mid way between the connector and the O2 sensor. You will now have 2 separate pieces. Strip the end of all of the wires so that you have about a half inch exposed on each wire.
Cut 4 equal strips of 20 gauge wire and strip the ends of these as well( the length you need will depend on how much of an extension you need -- each brand of midpipe mounts the O2 Bungs in different spots). I used about 2 1/2 feet for each wire.
You will now twist/solder these wires to the two halves of the O2 wiring harness so that it seems you have now just extended the wiring harness. Be sure to pay special attention to matching the wires up correctly. You wouldn't want a black wire now connected to a different color.
Tape up each solder point so that the wires don't touch each other. After each section is tapped you can then add another layer of tape around the entire area for extra strength.
The next step will be to cut the black and gray wire in the middle of the harness(the harness should now be about 3 feet long total and you will want to cut in the middle area so that you can tie wrap it up later away from hot exhaust areas).
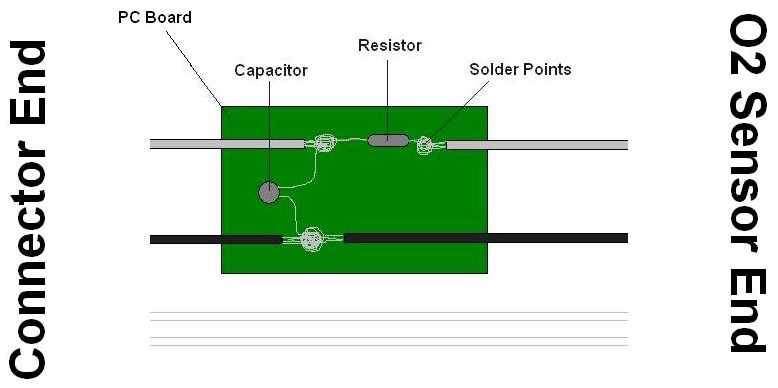
Go ahead and strip the wires in the same fashion as before and now you are going to follow the wiring diagram. Solder everything to the pc board as shown in the picture. Be sure to solder on the side of the board that has the little copper circles. The solder will hold everything tight to the copper area.
Be sure to pay attention to which end the Sensor is on and which the connector is on -- IT DOES MATTER.
After everything is soldered up wrap the entire wire area of the harness with the electrical tape. Once all of the steps have been completed you should see the two ends(one the connector and the other the O2 sensors) with electrical tapped wire from end to end.
Undo your battery terminals so that the car has now power.
Screw the sensors back into the pipe and plug the connector ends back into the car.
After getting the sensors plugged back up about 5 minutes should have passed. Put the terminals back onto the battery and you are good to go.
I can't absolutely positively promise you that this will work for your
car, but it has for mine and was much cheaper than buying MIL's/Extensions.
It works exactly like MILs do so if you have followed the instructions
and diagram you should be good to go and not have to look at an annoying
check engine light.
found @ http://www.bmcforums.com