|
|
||||||||||||
|
|
|
Westchester Web Design |
Please note that this install was done on a 1998 Mustang GT Coupe. Convertibles differ quite a bit, especially in the back seat department. It may be necessary to remove extra parts when working with a convertible. Also, it may not be possible to reinstall the rear seatback with the Upper Battle Box Plates without modification. This depends on how the large ½” bolts were installed (see pictures below of the final product).
Tool List
- 3/8� Drive Metric and SAE socket wrench set
- T47 Torx bit for removing seat belts
- T20 Torx bit for removing center console
- Torque wrench (up to 100 ft-lb capacity)
- Air cut-off tool or sawzall
- Floorjack
- Jack stands
(at least 4)
- Air cut-off tool or sawzall
- 1/2�, 3/8�, and 1/8� drill bits that can be used to drill metal
- Gasket Scraper
and coarse wire rotary brush
- Brakleen or other solvent to clean bare metal
- (8) 3/8x1.5” coarse thread grade 8 bolts and nuts
- (4) 3/8x2” coarse thread grade 8 bolts and nuts
- Panel popper
- Air ratchet and impact gun (very useful)
- Spray paint or rubberized undercoating
- Removable Loc-tite
Wild Rides Battle Boxes
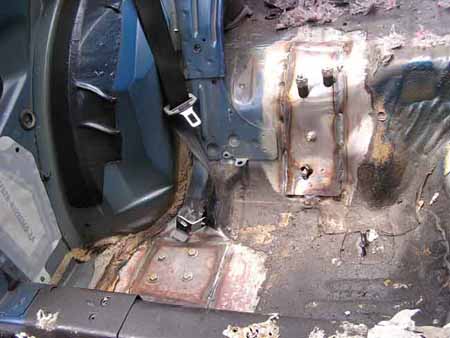
The stock torque boxes have a tendency to rip out of the frame where the stock spot welds fail. One remedy is to weld the stock boxes in multiple locations. Another option is to install torque box reinforcement plates like Wild Rides Battle Boxes. These plates distribute the load over a greater area and therefore help prevent torque box damage. It is a good idea to reinforce your stock torque boxes whenever you start using slicks or install aftermarket control arms that will put more stress on the stock boxes.
Whenever welding is done inside the car, such as welding the torque box plates to the floor, it is a good idea to remove the carpet to prevent fires. This is also a good time to install subframe connectors if you have not already done so.
Removing rear seatback:
The rear seatback must be removed when installing the Upper Battle Box Plates (For Upper Control Arm mounting support) and should be removed to keep it clean for Lower Battle Box Plates. Start by removing the rear head rest. (3) 8mm bolts hold this in. Next comes the seatback assembly. (5) 10mm bolts hold this in - (2) on the top and (3) on the bottom. Remove and set aside. If you wish to remove the rear seatbelts from the floor, use a deep socket 18mm and T47 Torx bit.
Lower Battle Box Install:
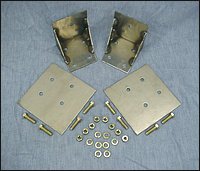
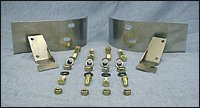
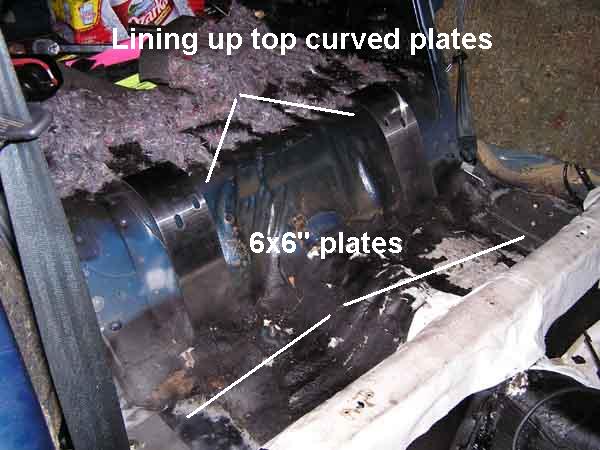
There are three major part groups for this: (2) 6x6” steel plates that go in the inside of the car (that will be referred to as ‘6x6” plates’), (2) welded boxed structures that go underneath the car (that will be referred to as ‘lower box plates’), and the bolts that hold everything together.
1. Take your 6x6” plates and Lower Box plates and spray all sides down with Brakeleen or other cleaning solvent to remove oil. After the units are dry, spray with rubberized undercoating. (This can be purchased from Autozone, etc.). Allow coating to dry over night. You may opt to paint them with spray paint to prevent rust, but spray paint removes easier than the undercoating.
2. Jack up the rear of the vehicle from the differential housing and place jack stands under the rear frame rails.
3. Jack up the front end and place jack stands under the front control arms or under the frame rail. (Note: the stock frame rail is very soft and may bend/warp a little. Try to place the jack stands as far apart as possible for more stability.)
4. Place the jack under the differential housing and lift the rear axle assembly until it is under full load.
5. With the rear suspension under full load, remove the lower shock bolt. These are 15mm and 18mm. Allow the rear shock to decompress.
6. Now lower the differential housing almost all the way down. Watch the hydraulic rear brake lines so they do not stretch. Place jack stands under the rear axle tubes.
7. Next, remove the (2) bolts that hold the rear brake cable in position along the frame. One is 10mm, the other is 13mm and is connected to the lower control arm. Removing these allows the cable to be loose and gives greater access to the torque boxes for cutting.
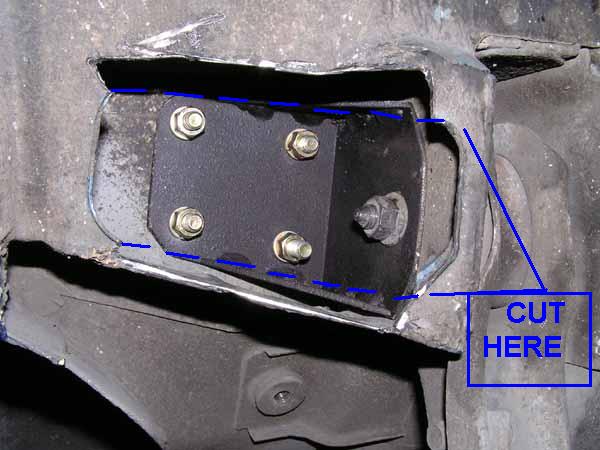
8. Using an air cut off tool (or sawzall) cut out an area large enough for the Lower Box Plate to fit inside. See picture below. It will be obvious how much you need to cut out. Once there is enough room for the piece to fit inside, you are done cutting. It takes a little adjustment to turn it around to line up. Take the Lower Box Plate out.
9. With the rear suspension fully loaded, remove the lower control arm nut inside the torque box. This requires (2) 18mm sockets. Unless you have small mufflers, you will most likely have to unbolt the exhaust where the pipes meet the intermediate h- or x-pipe. My bolts were 15mm, as were the stock. It may require an impact gun to loosen (and it’s faster too). Take one of the 18mm sockets and socket wrench and locate the bolt on the other side of the nut (by the muffler). With your impact gun, loosen the 18mm nut while holding the socket wrench. Remove nut and place to the side.
10. Now back the bolt out until it is flush with the inside of the torque box. You may have to push on the threaded side with your finger while loosening. This is an important step, as it makes it much easier to line the large hole up to the control arm bolt.
11. Insert the correct side Lower Box Plate (they are different). Line up the large hole on the side with the control arm bolt. The (4) other holes should face straight up. If the box does not fit completely flush with the top, it’s okay. Thread the control arm bolt back in and install nut and tighten down. As you tighten, the top part of the box will seat itself against the top.
12. After your nut is tight, get a 3/8” drill bit and drill through floor through the (4) holes in the Lower Box Plate you just installed. It is a good idea to go inside the car and redrill the same hole from the top to clean out the holes. This allows the bolts to slide in easier.
13. Wild Rides supplies (8) 3/8x1.5” bolts, (8) lock washers, and (8) nuts. On my install, I sheared two of the supplied bolts and warped several others. It is a good idea to get better bolts. Grade 8 bolts are available from your auto store for about $.30 each. Be sure to get grade 8 nuts too. The supplied lock washers are fine.
14. Take the 6x6” plate and line it up with the holes you drilled from inside the car. Both 6x6” plates are the same, so it doesn’t matter which one you use. Now drop the (4) bolts down the holes and outline the plate with something sharp.
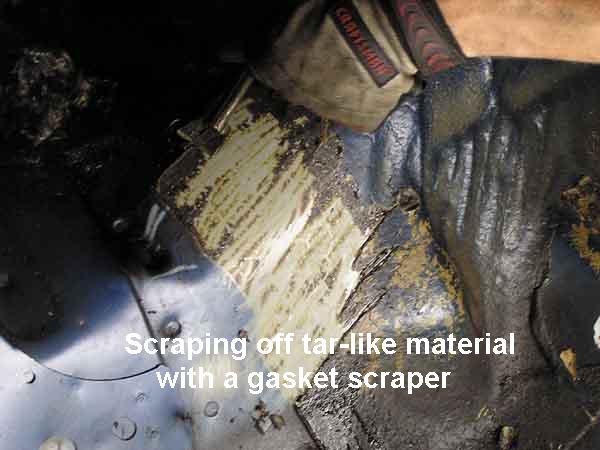
15. Remove the top 6x6” plate and start removing the coating on top of the bare metal on the floor. I used a gasket scraper with a handle. This stuff is tough to remove. I thoroughly soaked the coating with Brakleen and it seemed to help. You may also want to heat it with a small propane torch. Beware of burning the panels in the car with the torch! Once you have the majority of the material off, get a coarse wire brush used for rotary tools and remove excess material until you see the shiny metal below. You’ll want to remove all the material and galvanizing under the plate and about one inch around the plate for welding room.
16. Reinstall the 6x6” plate and drop the bolts down the holes. I was a little uneasy about the bolt heads against the plates, so I put washers between the bolts and plates.
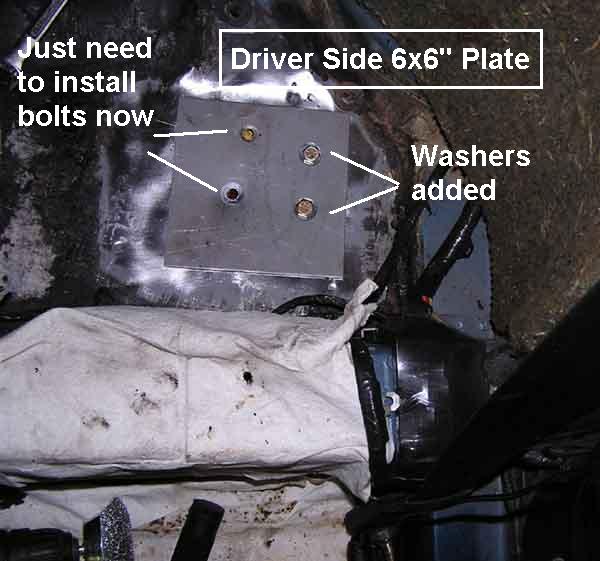
17. Now go under the car and put a lock washer on the bolt end, followed by a nut. Apply a dab of removable Loc-tite to the bolt. Tighten down snugly. After all (4) bolts are in, tighten them down HARD. I used an impact gun to do this. You will need someone to hold a combination wrench or socket wrench (9/16”) on the bolt heads inside while you torque the nuts down. (For reference, I sheared the bolts when removing them after torqueing to clean more of the floor off.)
18. Compress the rear shocks and reinstall bolt with nut facing outward. Torque to 65 ft-lbs.
19. Now torque down the control arm bolt to 85 ft-lbs. and reinstall the (2) brake cable bolts and holders.
20. You are now ready to weld the boxes in.
Upper Battle Box Install:
There are three major part groups for this: (2) curved steel plates that go in the inside of the car (that will be referred to as the ‘Curved Plates’), (2) welded structures that go underneath the car (that will be referred to as the ‘Lower Plates’), and the bolts that hold everything together.
1. Remove the upper shock nuts (15mm) from inside the car. Lower the rear end almost all the way down, being careful not to stretch the hydraulic rear brake lines.
2. Remove both upper control arms. The nut and bolt for the upper and lower control arm bolts are 18mm.
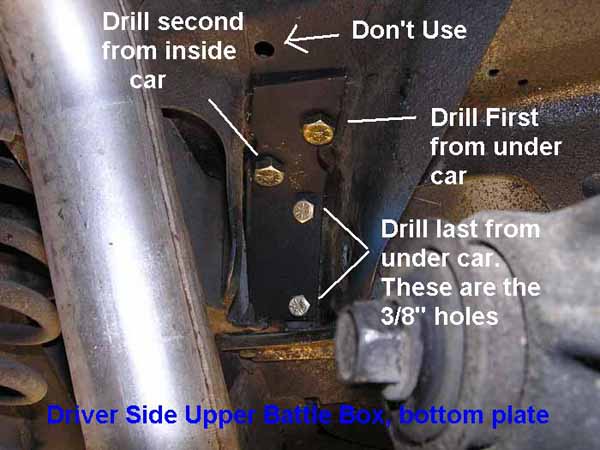
3. Locate the left and right side Lower Plates. (See picture).
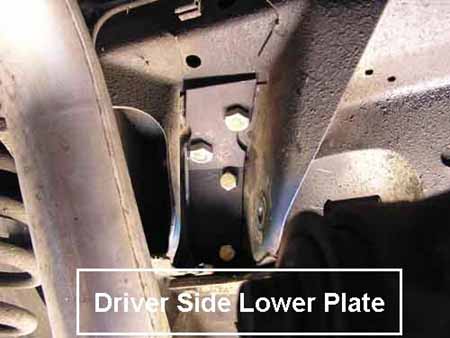
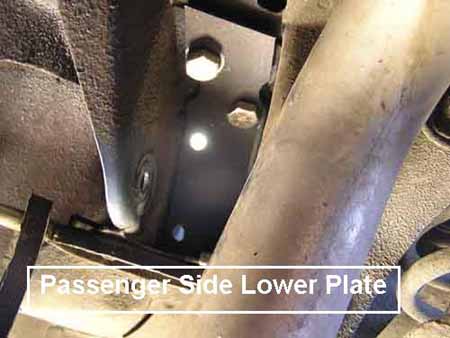
4. The big, offset holes (1/2”) will face upward and the smaller holes (3/8”) will face forward (toward the engine).
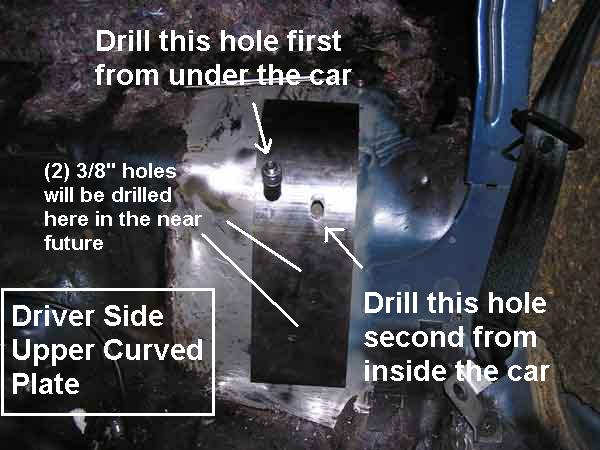
5. Using a 1/2” drill bit, drill through the oval 1/2” hole already in the floor. This is the “middle” hole that should line up with the higher hole in the Lower Plate you are about to install. Drill as straight up as possible. The straighter the hole, the easier it is to feed the large bolt through. You may want to lower/raise the rear axle assembly to get better working room with your drill.
6. Once the hole is drilled, go inside the car and redrill the hole from the top to clean out any debris.
7. Go under the car again and feed the bolt up through the hole you just drilled. It should go in easily. If not, you may need to make a larger clearance from inside. If this happens, have someone hold the bolt up and drill out a slightly larger hole so the bolt will fit. If the bolt is in the hole, but cannot be pushed up, try “threading” the bolt through. The threads will grab the side of the hole and pull it through.
8. Remove your 1/2” bolt and install your Lower Plate. Place the bolt through the top hole of the Lower Plate and though your hole. The bolt should go through the floor easily now.
9. Locate the left and right large Curved Plates.
10. The first 1/2” bolt should go through the floor and through the top oval hole in the Curved Plate.
11. Install the angled spacer and the nylock nut.
12. Move the Curved Plate around so it is as straight as possible.
13. Using a small drill bit for a pilot hole, drill your second hole from the inside of the car through the lower larger hole in the Curved Plate.
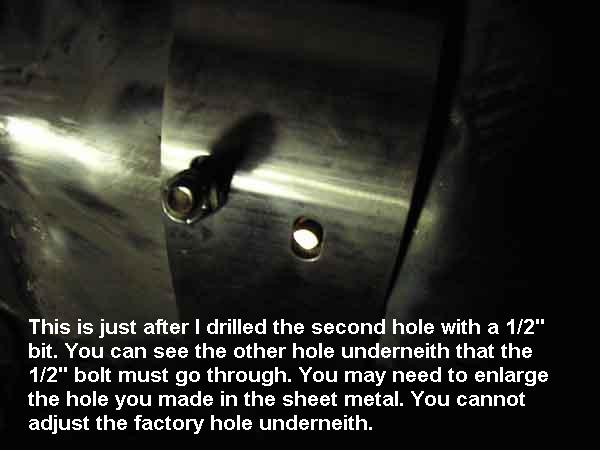
14. Remove the Curved Plate and Lower Plate from the underside of the car. Look through your pilot hole and locate the lower hole that is already drilled from the factory (just below the oval hole). This is a different hole than the one you already drilled. You want to drill through the center of your pilot hole and straight down through this hole. The hole on the underside is not quite 1/2”, and needs to be drilled though as well.
15. This hole is hard to get just right. It is very possible that you will need to either redrill this hole or widen it if the bolt will not go through. Once the hole is drilled, reinstall your first 1/2” bolt and Curved Plate. Place a nut on the bolt once it is in to prevent it from coming out. Feed the second 1/2” bolt from underneath the car. You may need to widen the hole on the inside of the car a little for it to go through. This is okay. I ended up with oval shaped holes on this part for them to line up.
16. Outline the curved plate with something sharp. Remove the Curved Plate and Lower Plate. Start removing the sound deadening material from the floor. I used a gasket scraper with a handle. This stuff is tough to remove. I thoroughly soaked the coating with Brakleen and it seemed to help. You may also want to heat it with a small propane torch. Beware of burning the panels in the car with the torch! Once you have the majority of the material off, get a coarse wire brush used for rotary tools and remove excess material until you see the shiny metal below. You’ll want to remove all the material and galvanizing under the plate and about one inch around the plate for welding room.
17. Reinstall the Curved Plates and Lower Plates. Reinstall both 1/2” bolts. Now with both 1/2” bolts in, place the angled spacers on the bolts the followed by the nylock nuts. Tighten the nylock nuts down until they are snug. Do not over-tighten them. 20-30 ft-lbs will be sufficient. I don’t know what happens if you over-tighten them, but I speculate that it could break the angled spacers.
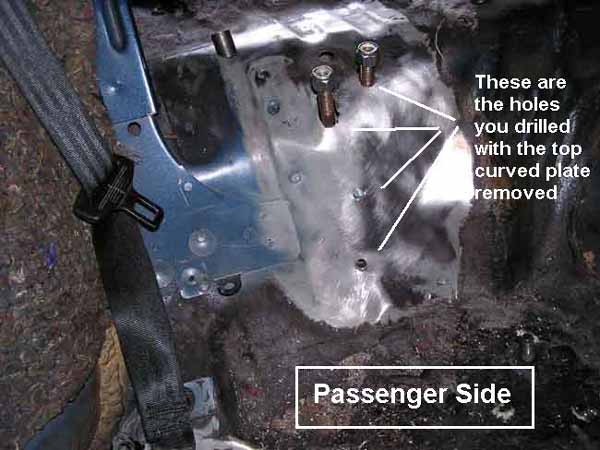
18. With the Curved Plates tight against the floor, go underneath the car and drill (2) 3/8” holes through the small 3/8” holes in the Lower Plates. These holes will take a while to drill. Try to drill these holes as perpendicular as possible - this will help you later. Once you are through the floor, have someone hold the Curved Plates inside the car while you drill through them. If you do not have a helper, go to step 19. If you have a helper, go to step 20.
19. Skip this step if you drilled through the Curved Plates with a helper. If you don’t have someone to help, drill your (2) 3/8” holes and continue drilling until you go through the floor. Drill a little deeper until you are contacting the Curved Plates. Use the drill bit to scour the plate so you know where to drill through. Remove the plate and use a larger drill bit (1/2” works great) and drill through your scour mark. This method is not as good as the one with a helper, but if you are alone, it will work just fine. Reinstall your Curved Plate.
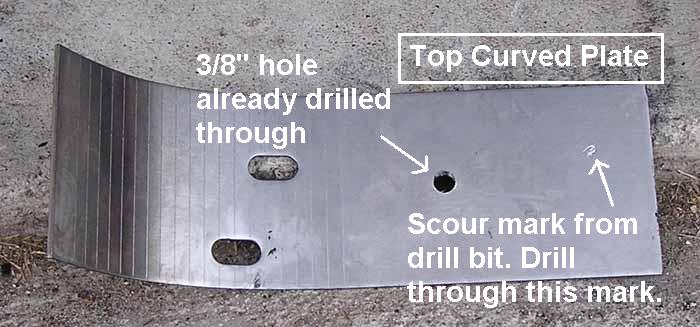
20. Note: Wild Rides supplied (4) 3/8” bolts that are 1.5” total length to bolt the curved plate to the floor. These are barely long enough, so I recommend a 2” bolt for the job. It’s possible to use the 1.5” bolt, but if you drilled your 3/8” hole at an angle, you might not have enough room to thread a nut on the end of it.
Insert your 3/8” bolts through the 3/8” holes you just drilled from underneath the car. For reference, the bolt should be coming through the floor into the interior. Place a crush washer on the end, followed by a nut. A dab of removable Loc-tite on the bolt will keep it from backing out in the future. Tighten these nuts down hard. 50-60 ft-lbs should be sufficient. A socket wrench with a long handle will work great. Don’t use an impact gun unless you upgrade to grade 8 bolts, as the supplied bolts may shear. It is okay if the Curved Plate bends a little while you tighten the nuts down.
21. Reinstall the upper shock nuts (15mm) and upper control arms. If you did not move the rear axle assembly up or down during the install, the bolts should line right up. If you adjusted the height, you will have to play with the axle height to get the upper control arms back in. Install the top bolt first. You may need to lift one side of the housing at a time to get the holes to line up on either side. Once the bolts are in, place the rear axle assembly under full load and torque down to 85 ft-lbs. Torque the upper shock nuts to 65 ft-lbs. You are now ready for welding.
Welding the boxes in:
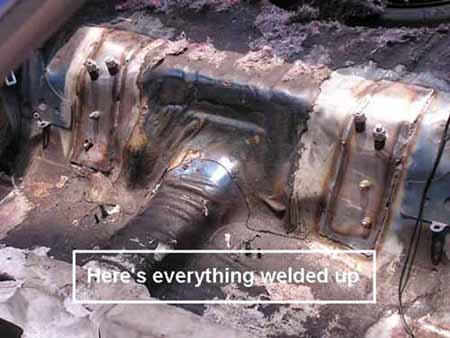
Now that you have finished installing everything, it is time to weld. I did not weld mine in myself. I took them to my local performance shop. The Lower Battle Boxes were easy, but the Upper Battle Boxes (Curved Plates) took some assistance before welding, meaning a large hammer was used to beat down the corners to make them flush with the floor. A few tack welds around the corners and along the sides are probably sufficient, but I had them weld all the way around. The Upper Battle Box Plates had gaps that made this impossible, but 90% of the edge is welded. See pictures of the final product. It is a good idea to spray the bare metal down to prevent rust. It should take less than an hour to weld all four plates in if everything else is in order. My shop charged $200 to weld the sub frame connectors and plates. About $75 of this went to the plates.
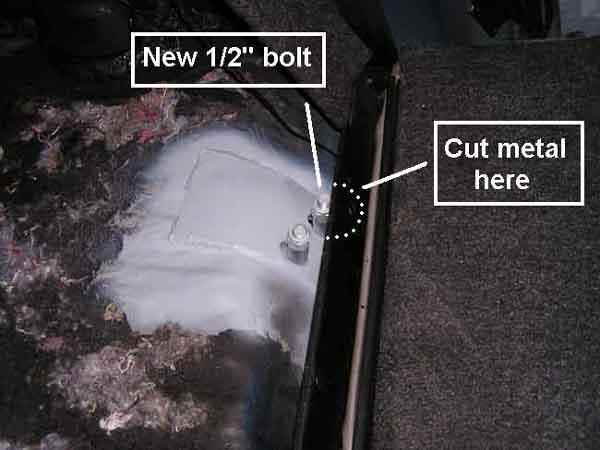
Rear seatback problem:
After
you install the Upper Battle Boxes, the lower of the two 1/2” bolts will
stick up through the floor right where the metal perimeter of the rear
seatback goes. One option is to throw out the back seat in favor of a
rear seat delete kit. The other option is to remove some metal from the
seatback so it will clear the bolt and nut. You’ll need to remove about
one inch of metal from the seatback where the bolt will fit. A nice circular
cut out will allow the bolt to fit.
Blue98GT. http://www.angelfire.com/extreme5/blue98gt/battle_boxes.htm